


I hope you enjoy reading this blog post.
If you want to get more traffic, Contact Us


Click Here - Free 30-Minute Strategy Session
Be quick! FREE spots are almost gone for this Month. Free Quote

It can be said that most of the internet users knows about or have heard about Google Optimization and have done some research to really find out what it is.
But what is it really? It is a Google feature that creates solutions for A/B testing and personalization.

Click Here – Free 30-Minute Strategy Session
Be quick! FREE spots are almost gone for this Month
Google Optimize was first launched in beta format some time ago and has created a “line” of internet optimizers ready and waiting to give this interesting feature a try.
It helps internet marketers and gives them the edge in improving a site’s conversion rate from its visitors.
But the question may arise as to why choose this feature? What will it do for me and my site?
How will it benefit the whole operation of what I am offering my site users?
For sure, there are so many other testing tools available on the market that internet marketer can choose from.
The internet world has the famous saying, “Marketers love tools and tools love marketers”,
which works true because they depend on each other to function effectively.
With the many tools available, marketers sometimes have the stress of having to source multiple tools to perform each function and that can be really annoying and frustrating.
This is where Google and its major development come in.
It creates one central feature that eliminates the need for multiple tools and simply has one to combat all conversions, channels and other tasks.
Now who would give up on a tool like that? Nobody I’m sure.
He notes, “Enter Google Optimize, an A/B testing and personalization tool that uses Google Analytics data to power your CRO efforts. Obviously A/B testing is nothing new; neither is serving personalized content based on customer behavior. The true progress here is how Google Optimize pairs with Google Analytics, and how easily we can tie our experiments to KPIs in Google Analytics.”
He also cited the valuable factors associated with the optimizer in terms of its easy setup,
ability to achieve more advanced targeting, ability to provide a more advanced reporting as well as applying learning faster than the other testing tools.
Really to compare and say that this optimization tool has a high competitive rate,
is really an understatement because no other testing tools have been able to provide as much the Google Analytical features that this Google Optimizer provides.
Other experts like Krista Seiden of Google also weighed in on the issue when she gave her live report on the Google Optimize and personalization at the CXL Live event.
She noted the incorporation of Google Analytics to the Optimize is one of the elements making it a strong as it is.
The Analytics features helps to record relevant data from your site which makes the optimization process much more efficient and simple.
– Data is recorded on how many times a loyal customer may visit your site and what they did or purchased.
– Geo-location in terms of offering special services to select group of visitors from your site.
Once you have collected the required data,
you can alter your site’s benefits to suit the need of a special target audience from any selected area.
We are sure you may have used other testing tools like Optimizely or even VWO but may not really be as satisfied as you wanted to be.
So the ultimate question then arises, why I should use Google Optimize.
· Having a familiar UI
· It’s a free feature so you have nothing to lose
· All your collected data will be shared across your Google Analytic platform as well as the Google Optimize platform.
This one a whole allows a marketer to better get advance targeting, reporting and advanced conversion from their site.
There are always two versions to any tool, a free version and a paid version.
Though it was noted that it was free, there is also a paid option so you do have a choice nonetheless.
So the free version referred to Google Optimize and the paid version Google Optimize 360 does have similar features.
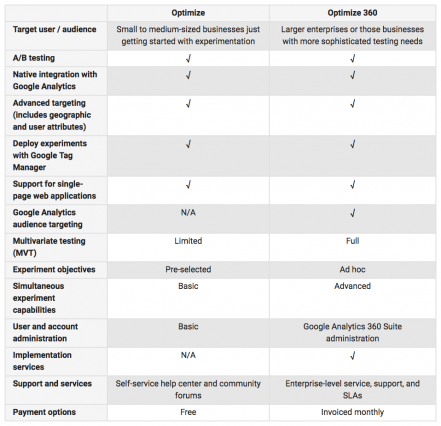
If you are a new marketer or you have a small to medium-sized business, then the free versions may work quite well for you.
However, if operating a larger enterprise or you wants to work with a sophisticated testing program you may need to go for the more complex version the paid version.
As we all know, when we are working with any given tools, there will be obvious differences between the free and paid version; the most obvious been the limitations associated with one to the other.
– No Google Analytics audience targeting
– Only 16 multivariate testing
– Having pre-selected experiment objective unlike the paid version which allow users to go back and assess the impact the experiment on other aspects of the Analytic platform.
– Only 3 testing options at any given time.
Once you are ready to start on the Optimize, you may need to visit the Google Optimize site and select the “sign up for free” option.
One key factor to bear in mind about the Optimization tool as well is that the more one knows about the tool, the better it works for them.
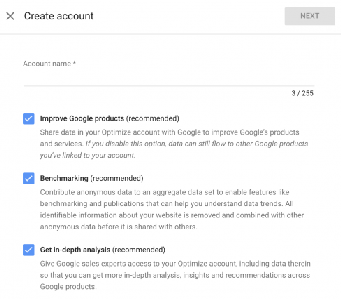
After reaching the sign up page, you will be prompted to choose an account name which can be,
your company name, your domain or anything you feel suitable to choose.

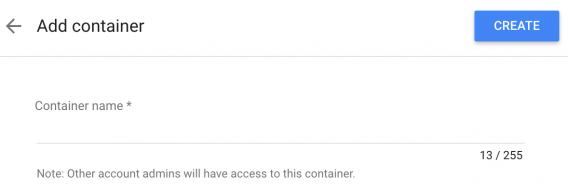
You will then be asked to add a container to your account.
You can choose names like “XXX Blog” or something similar in nature. One key note is that other site admin will also have access to this created container.
After those few stages, you will be redirected successfully to the Experiments view page.
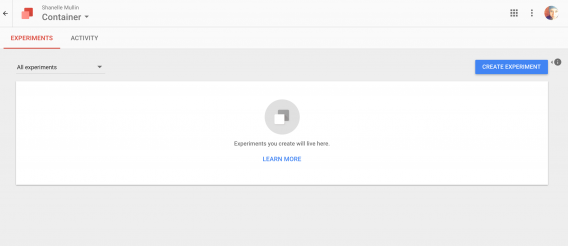
On this page, you will then need to select the gray information icon in the right hand corner which should display your on-boarding checklist
(if not shown right away when you reach the page).
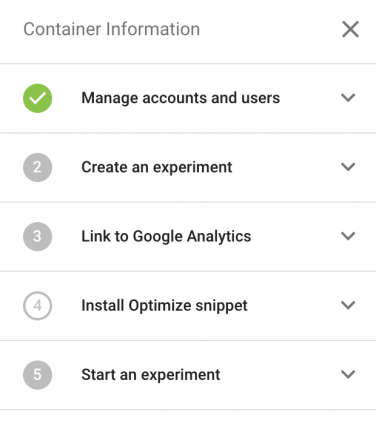
This section will highlight the different stages you will go through to completing your setup.
When the sections are expanded, you will get the relevant information that is associated with each.
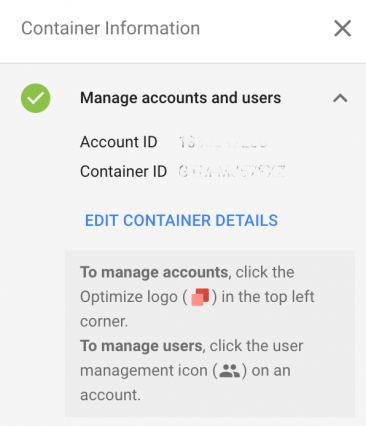
For example, if the “Manage accounts and user” tab is expanded, you will see this message displayed, “An account and container have been created for you! Google Optimize uses accounts and containers to organize your experiments. An account is the top level of your organization hierarchy, and it usually represents a company. A container is located within an account and typically represents a website.”
Your Account ID and Container ID will also be available to you in this section.
You will be prompted to start an experiment but ensure you add a Google Analytic first as this is highly recommended.
To do this, you will need to expand the “Link to Google Analytics” item.
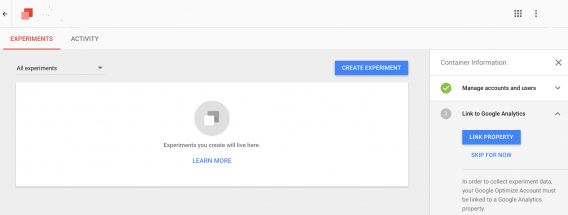
– Select the blue “Link Property” option after which you will be asked to choose a Google Analytics property.
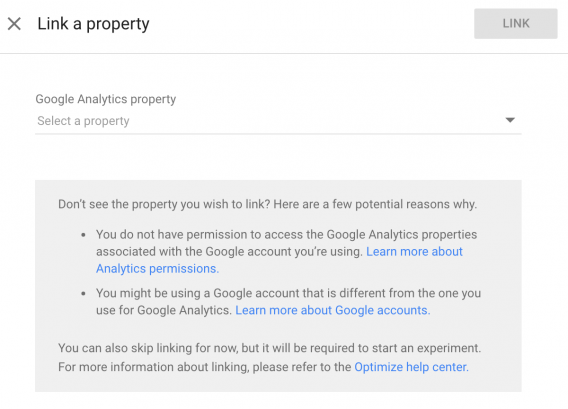
– Once the property is selected, you will be prompted to view some links from which you will select one, once you note it,
simply click “Link” and you are good to go.
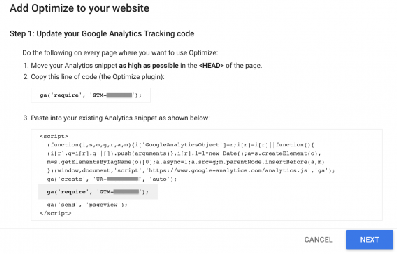
Once you have successfully completed the previous steps, you will now need to install the Google Optimize snippet on your site.
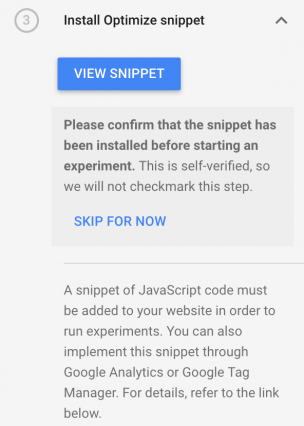
This is the third stage on the on-boarding menu.
– Select the blue “view snippet” option to install. Please note that you will need to add Universal Analytics (analytics.js) before you can successfully install the Google Optimize.
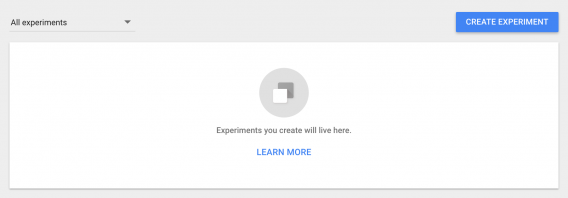
Once you have gone through the various steps of successfully installing the snippet,
it will now be the time to create an experiment.
This process is simple and can be done easily once following the step by step guide you are presented with.
First time users can also research step by step ways on how to create their first experiment (with pictures) if they are not too sure.
Many people have noted using one of their direct guides when they enter small problems.
This site, guides on how to effectively go through the processes.
– When ready to create, you will need to select the “Create Experiment” from the Optimize Container page.
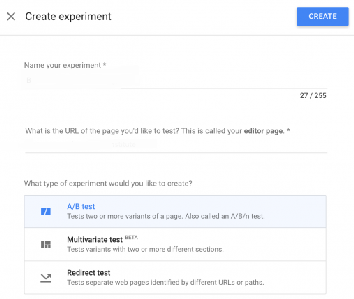
– Provide the details of your proposed experiment including entering your experiment name,
editor page and what type of experiment you may need to run.
From the editor’s page, you will be making the relevant modifications to using the visual editor.
What does this mean? For instance, you are running the experiment on a blog; you will need to enter the given blog URL.
This is the same blog you will perform the selected experiment targeting on.
Select the type of experiment you want to run on your site. Generally, there are three types of experiment to choose from including:
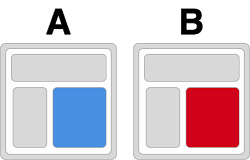
This can be used to test two or more variants on a given page. This is sometimes referred to as the A/B/N test. This is among the most commonly used experiments on the Optimizer.
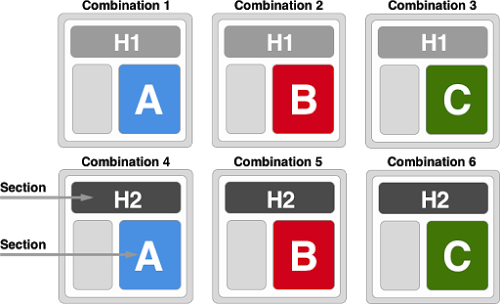
You can use this to test variants compromising of two or more different sections on any select page and/or page template.
You can also try multiple combinations of factors on the same page and/or page template.
This allows for testing separate web pages which have been identified by different URLs.
Bear in mind, if you are making large changes to your page coding, this may cause your overall page to become slow.
If this is the case with your page, then the redirect test would be your experiment choice.
Because this is the most commonly used and the simpler of the tests types,
we will show you how, as a beginner, to run a successful experiment.
For this experiment, there are two main tabs involved, the “Details” and the “Reporting”.
As clearly define, the details mainly refer to the medium through which you will be able to find and modify selected experiment information.
The reporting refers to where the data will be reported for analysis.
Also, there are two main sections which you may encounter during the processes. These are:
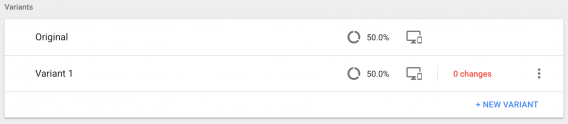
This is the option through which you will be able to see all the variants involved in your experiment; the amount of traffic received through each variant;
a preview of how the experiment will show or look from a mobile and desktop perspective;
the changes made to each of the variants and any additional options including to edit or delete the variant.
This involves providing the description for the experiment as well as selecting prospective experiment goals/objectives and choosing your parameter targets.
Selecting objectives is vitally important as it helps provide clarity on how the experiment is going as well as determining the level of achievements.

Also, creating a hypothesis along with the description (which many first time marketers tend to avoid but which is not recommended),
also provides a clear guide when results are received.
Providing the other relevant details for the experiment will allow it to be conducted efficiently and smoothly.
The process is quite straightforward once you have completed the steps and stages above
which you will then be clear to running and/or launching your experiment.
Google Optimize can be considered one of the most effective and efficient tools created to give you ease of running a successful site.
The steps and procedures outlined above are the relevant guides to adapting to and using the
optimization tool to alter the way you efficiently provide services to your target audiences.
Whether you choose to work with the free or paid version of the Optimizer, you will definitely have no regrets.
There are many marketers across the world that have worked with various types of optimizers and have received different results as needed.
Many of been faced with both positive and negative feedback from these optimizers which they have had to find ways to resolve them.
Since the inception of Google Optimize through the beta testing stages straight through to the initial launch, there have been many success stories.
Persons with both small and large sites have worked with the Optimization tool and have voiced their satisfaction of the tool.
Be quick! FREE spots are almost gone for this Month


LEAVE A REPLY