


I hope you enjoy reading this blog post.
If you want to get more traffic, Contact Us


Click Here - Free 30-Minute Strategy Session
Be quick! FREE spots are almost gone for this Month. Free Quote

While it may seem logical to have all website pages indexed by search engines, that’s not always the best approach. Strategically preventing certain pages from appearing in search results plays a vital role in optimising your indexing strategy.
With the help of the noindex tag, you can exercise precise control over which pages get indexed and which ones remain hidden from search engine crawlers.

Click Here – Free 30-Minute Strategy Session
Be quick! FREE spots are almost gone for this Month
The Noindex tag, an essential HTML element, empowers website owners to influence how search engine bots handle specific pages or files. By incorporating the Noindex directive, you can effectively prevent search engines from indexing those particular pages or files.
To exclude a page from indexing, you can employ the Noindex tag within a robots meta tag. Simply place the following code snippet in the HTML’s <head> section:
<meta name=”robots” content=”noindex“>
Alternatively, you can add the Noindex tag as an x-robots-tag in the HTTP header:
x-robots-tag: noindex
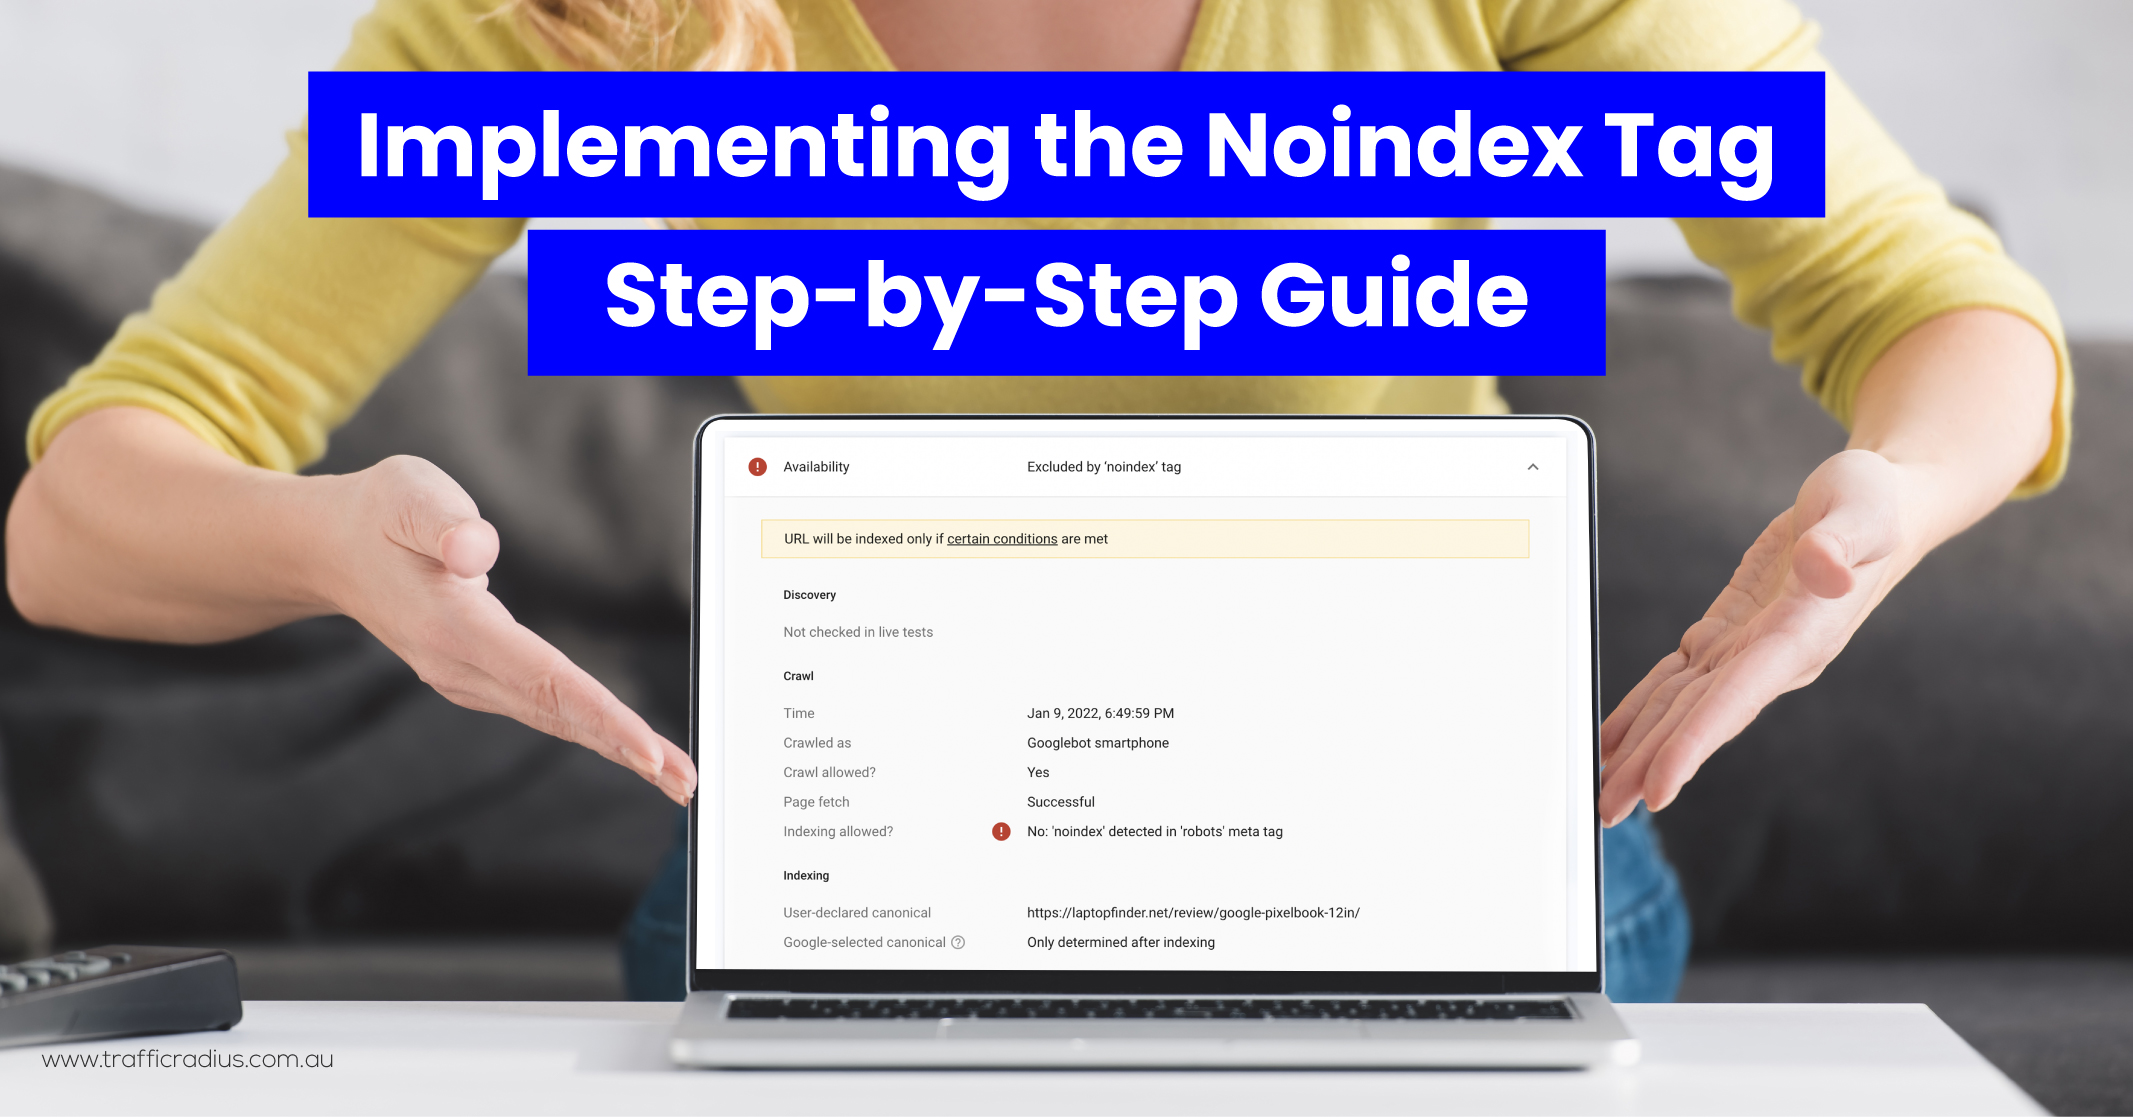
When a search engine bot, such as Googlebot, encounters a page with the Noindex tag, it refrains from indexing it. Even if the page had been previously indexed, the addition of the Noindex meta tag prompts search engines to remove it from search results, regardless of any external links pointing to it.
It’s worth noting that while search engine crawlers typically adhere to Noindex directives, some variations may exist in how different crawlers interpret robots meta values. While these directives are generally regarded as suggestions rather than strict rules, widely-used search engine crawlers, like Googlebot, diligently respect the Noindex directive, ensuring the desired exclusion from search results.
In summary, harnessing the power of Noindex tags allows website owners to assert greater control over search engine indexing, strategically preventing certain pages or files from being included in search results.
Learn More: No Follow Links Vs Follow Links – A Comparative Study

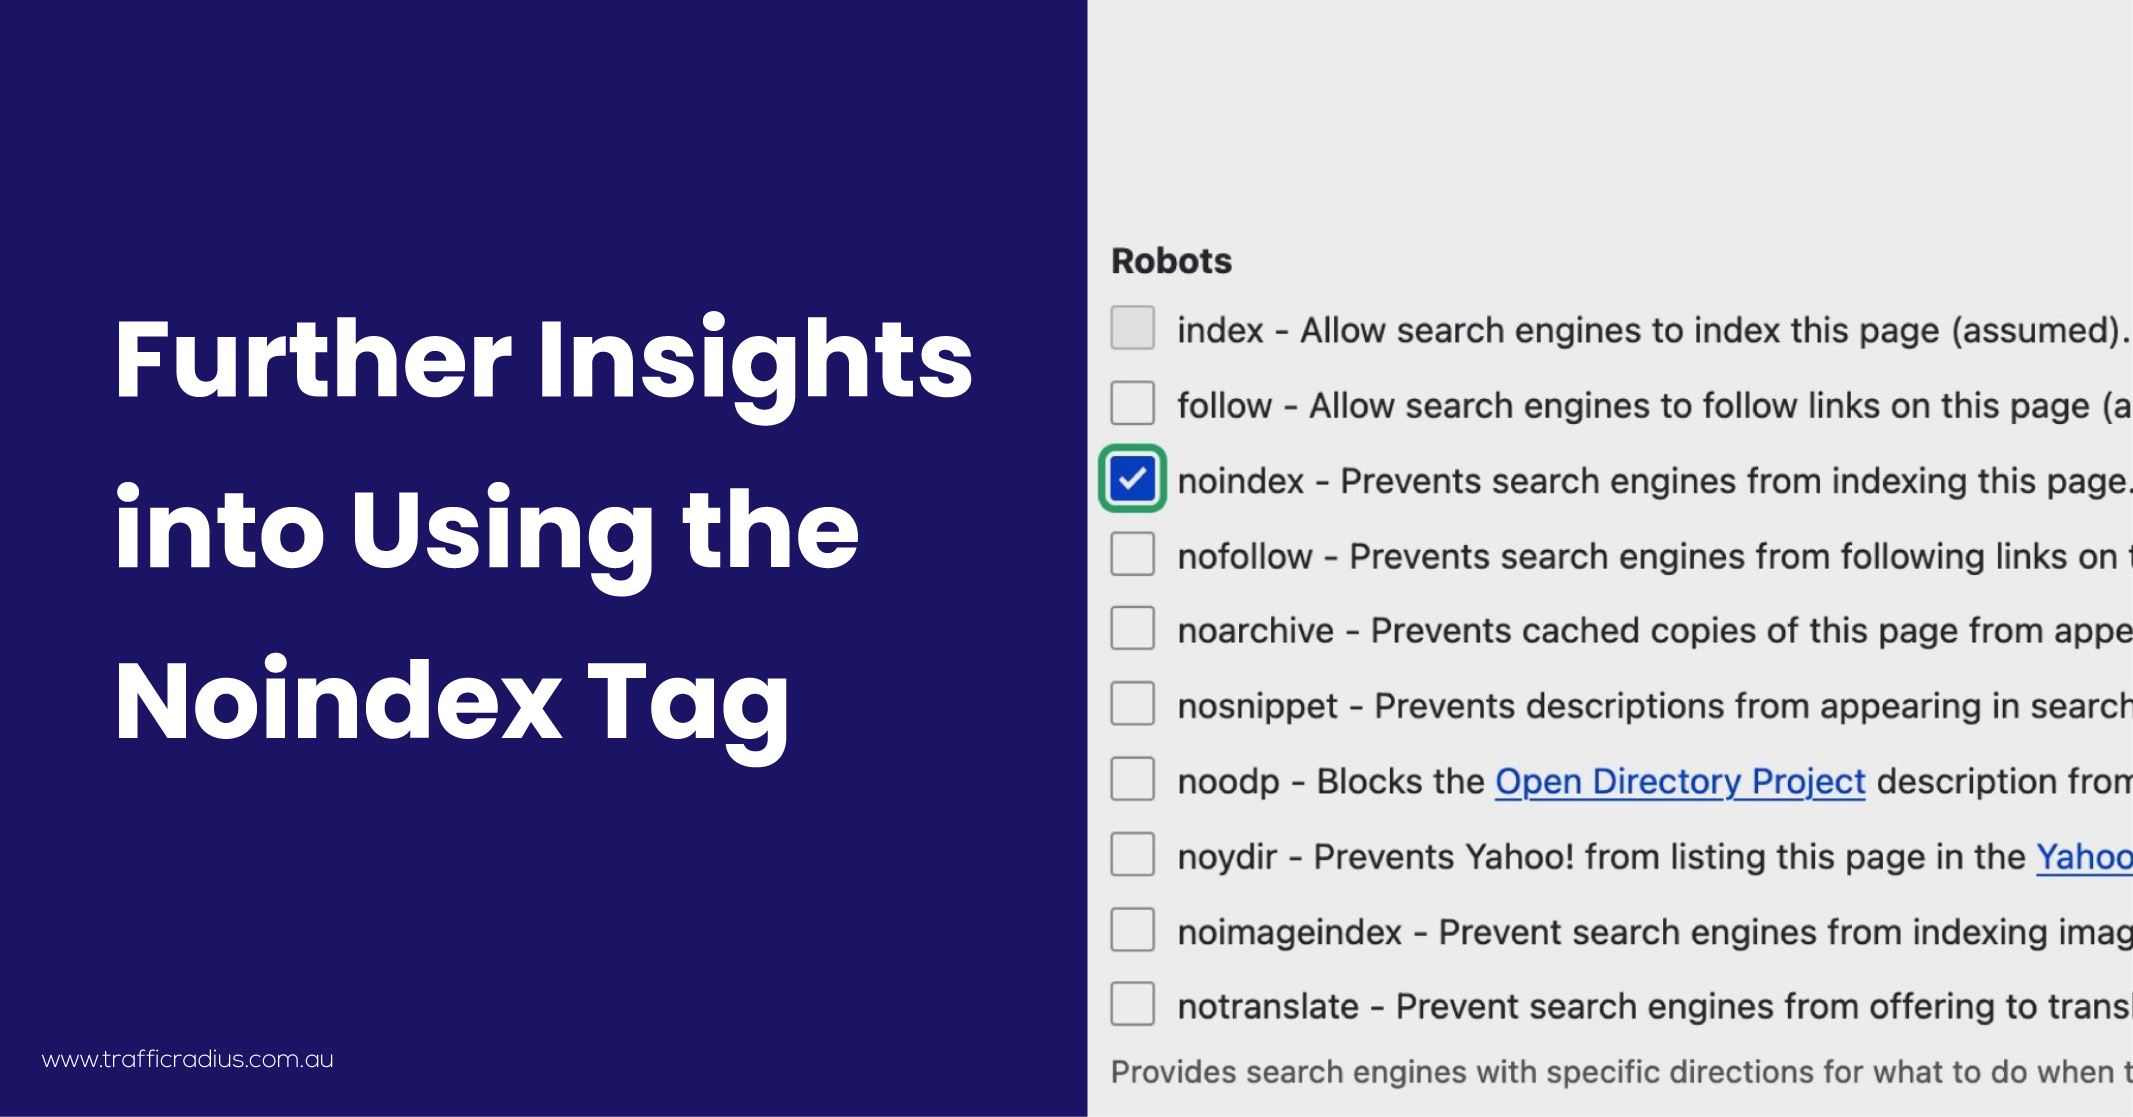
While Google supports various meta robots directives, the most prevalent ones include “nofollow” and “follow.” Notably, the “follow” directive is the default setting in the absence of any robots meta tags, rendering it unnecessary to explicitly specify.
The “nofollow” tag serves the purpose of preventing search engines from crawling the links present on a page. Consequently, the ranking signals associated with that particular page will not be passed on to the linked pages.
While the “noindex” directive can be used independently, it can also be combined with other directives for enhanced control. For example, you can include both “noindex” and “nofollow” tags if you desire to prevent search engine bots from indexing a page and following its embedded links.
In cases where you have implemented the “noindex” tag, yet the page continues to appear in search results, it is likely that Google has not crawled the page since the tag was added. To prompt Google for a recrawl, you can utilise the URL Inspection tool, ensuring that the updated indexing instructions are acknowledged.
To prevent certain pages from being indexed by Google, it is advisable to employ the noindex tag. Prioritising the optimisation of valuable pages while making less important ones non-indexable is essential, considering the limited resources of Google in crawling and indexing every web page.
Identifying the types of pages where the noindex tag should be implemented:
In case Google Search Console notifies you about indexing problems related to duplicate content, consult our guides to resolve issues such as the “Duplicate, Google chose different canonical than user” status or the “Duplicate without user-selected canonical” status.
Excluding pages from indexing should be a part of a well-defined indexing strategy. However, it is crucial not to include the noindex tag on valuable pages that generate significant organic traffic, such as popular product pages, up-to-date blog articles, about me, and contact pages, as well as pages describing the services offered.
Remember to utilise tools like the noindex checker and follow appropriate procedures on how to add the noindex tag for effective implementation of SEO tags and to optimise your indexing strategy.
The noindex tag offers two primary implementation methods: insertion into the site’s HTML code or inclusion in the HTTP response headers.
Certain content management system (CMS) plugins, like Yoast, provide automated options to apply the noindex directive to the pages you publish.
Let’s explore the step-by-step process for each implementation method and evaluate their respective advantages and disadvantages.
To incorporate the noindex tag, you can utilise the robots meta tag within the <head> section of a page’s HTML code. Robots meta tags play a crucial role in controlling a website’s crawling and indexing process, although they remain hidden from users and are specifically targeted by bots during the crawling phase.
Here is an example of how to implement the code:
<!DOCTYPE html>
<html>
<head>
<meta name=”robots” content=”noindex”>
</head>
<body>
</body>
</html>
Let’s clarify the structure of a robots meta tag:
Within the meta tag, you will find pairs of attributes and values:
<meta attribute=”value”>
The robots meta tag consists of two attributes:
Both attributes require different values based on the desired actions of the bots. It’s important to note that both the name and content attributes are case-insensitive.
Typically, the name attribute will have the value “robots,” indicating that the directive applies to all bots. However, it is also possible to specify a particular bot’s name, such as “Googlebot,” although this is less common. If you wish to target multiple bots individually, separate meta tags need to be created for each one.
Keep in mind that different search engines employ various crawlers for different purposes. You can refer to Google’s list of crawlers to understand their specific functionalities.
Meanwhile, the content attribute contains the directive for the bots to follow. In the case of implementing the noindex tag, the value will be “noindex.” It is also possible to include multiple values, separating them with commas.
By accurately structuring the robots meta tag, you can effectively control the indexing behaviour of search engine bots and ensure the exclusion of specific pages from their index.

The HTML method of implementing the noindex tag offers simplicity and flexibility, making it easier to modify without requiring server access.
Unlike the HTTP header method, which involves server-level configuration, the HTML method allows for direct modification within the code of individual pages. This eliminates the need for technical server access, making it more accessible to website owners.
However, it is important to note that implementing the noindex tag through HTML can be time-consuming. Manual addition of the tag is required for each page that needs to be noindexed, which can be laborious for websites with numerous pages.
Overall, while the HTML method provides convenience and does not demand server access, its drawback lies in the manual effort required for each page’s implementation.
Another approach to implementing the noindex directive is by specifying it in an x-robots-tag, which resides within the HTTP header response. HTTP headers facilitate communication between a server and a client, such as a browser or a search engine bot.
To configure this method, adjustments need to be made to the HTTP web server settings. The specific code format will vary depending on the server being used, such as Apache, Nginx, or others.
Here is an example of what an HTTP response with an x-robots-tag can resemble:
HTTP/1.1 200 OK (…) x-robots-tag: noindex (…)
By including the x-robots-tag in the HTTP headers, the desired noindex directive is communicated to search engine bots. This method offers an alternative to implementing the noindex tag directly in the HTML code or through CMS plugins, providing more control at the server level.
If your website is hosted on an Apache-based server and you intend to noindex all files with a “.pdf” extension, you can achieve this by adding a directive to the .htaccess file. The .htaccess file contains server configuration rules that can be modified to customise website behaviour.
To implement the noindex directive for PDF files, consider using the following sample code in your .htaccess file:
<Files ~ “.pdf$”>
Header set x-robots-tag “noindex”
</Files>
This code instructs the server to apply the x-robots-tag header with the value “noindex” to any file matching the pattern “.pdf$”. The regular expression “.pdf$” signifies that the file extension must be “.pdf” for the directive to be enforced.
If your website is hosted on an Nginx-based server and you wish to noindex all files with a “.pdf” extension, you can achieve this by implementing a directive in the server’s .conf file. The .conf file contains the server configuration settings that can be customised to modify the behaviour of your website.
To implement the noindex directive for PDF files on an Nginx server, you can use the following code snippet in your .conf file:
location ~* .pdf$ {
add_header x-robots-tag “noindex”;
}
This code instructs the server to add the x-robots-tag header with the value “noindex” for any location that matches the pattern “.pdf$”. The regular expression “.pdf$” ensures that the directive is applied specifically to files with the “.pdf” extension.
One notable advantage of utilising the noindex directive in HTTP headers is its applicability to various web document types, including PDF files, videos, and images. Unlike the HTML method, this approach allows you to target non-HTML pages as well. Moreover, it offers the flexibility to specifically target and exclude certain parts of a page.
The x-robots-tag, used in HTTP headers, supports the use of regular expressions (RegEx). This means you can define common characteristics or patterns shared by pages you want to noindex. For instance, you can target pages with URLs containing specific parameters or symbols using RegEx.
However, it is important to note that implementing the x-robots-tag requires server access. This method necessitates technical skills and is comparatively more complex than adding robots meta tags directly to the HTML of a website.
In summary, leveraging the noindex directive in HTTP headers offers advantages such as compatibility with various document types and the ability to target specific sections of a page. While server access is required for implementation and technical proficiency is necessary, this approach provides more versatility compared to adding robots meta tags to the HTML code of a website.
To confirm the implementation of the noindex tag or other robots meta directives, you can utilise different checking methods based on how they were added to a page.
If the noindex tag was added to the page’s HTML, you can inspect the page’s source code to verify its presence. Alternatively, for pages utilising HTTP headers, you can use the Inspect option available in the Chrome browser. These tools provide visibility into the recognised directives on a given page.
Other verification options include using Google Search Console’s URL Inspection tool by entering the page’s URL. Additionally, the Link Redirect Trace extension can be utilised to check for the presence and effectiveness of noindex directives.
These methods serve as reliable ways to verify the implementation of noindex nofollow tags and other robots meta directives, providing insights into whether they are properly recognised and being applied on the desired pages.
Take action now and let us help you enhance your website’s indexing and overall search engine visibility.
Additional guidelines and characteristics on how to add Noindex Tag:
Adhering to these guidelines will help ensure the accurate implementation and proper understanding of the robots noindex nofollow tag, enabling you to effectively control the indexing behaviour of search engine bots on your website.
Noindex tags, robots.txt files, and canonical tags play interconnected roles in regulating the crawling and indexing of web pages. While they share the objective of indexing control, each serves distinct purposes and is applicable in different scenarios.
As previously discussed, noindex tags operate at the page level, enabling precise control over whether specific pages should be indexed by search engines.
By understanding the distinct characteristics of SEO noindex tags, robots.txt files, and canonical tags, website owners can effectively leverage these tools to optimise their indexing strategies and enhance the visibility and relevance of their web pages in search engine results.
Robots.txt files serve as a means to control the crawling behaviour of search engine bots on a directory level within a website. These files contain directives that either “disallow” or “allow” specific bot behaviour, influencing whether certain pages are crawled and subsequently indexed.
By using robots.txt directives, website owners can prevent search engine bots from crawling disallowed pages, effectively excluding them from being indexed. This strategic use of robots.txt files helps optimise a website’s crawl budget, ensuring that bots focus their resources on crawling important and relevant pages.
However, caution must be exercised when implementing both noindex tags and robots.txt noindex. For a noindex directive to be effective, the corresponding page must be accessible for crawling, meaning it should not be blocked by the robots.txt file.
If a page is blocked by the robots.txt file and the crawler cannot access it, the noindex tag will go unnoticed and won’t be respected. Consequently, the page may still be crawled and appear in search results if other pages link to it.
To successfully implement the noindex directive, it is necessary to allow crawling of the page in the robots.txt file and simultaneously use the noindex meta tag to block its indexing. This combined approach ensures that search engine bots, like Googlebot, will follow the noindex directive and prevent indexing of the specified page.
By carefully managing the interplay between noindex robots.txt rules, website owners can exert greater control over the indexing behaviour of search engine bots and enhance their website’s search engine visibility and performance.

Canonical tags serve as HTML elements that communicate to search engines which pages among similar ones should be considered the primary version and indexed. These tags are typically placed on secondary pages, specifying the canonical URL and indicating that these secondary pages should not be included in the index.
It’s important to note that while canonical tags can influence indexing, search engines like Google may not always fully respect these tags. If Google discovers more links pointing to another page, it may prioritise that page as the primary version, regardless of the specified canonical URL.
Additionally, canonical tags are discovered by search engine bots during the crawling process and do not serve the purpose of stopping a page from being crawled, unlike robots.txt files.
A key distinction between canonical tags and noindex tags lies in the handling of ranking signals. Canonicalised pages consolidate ranking signals under a single URL, providing a more unified signal to search engines. In contrast, noindexed pages do not pass ranking signals, which is significant in terms of internal linking since they will not contribute ranking signals to the URLs they link to.
Preventing low-quality pages from being indexed is a crucial SEO best practice for optimising your indexing strategy. The noindex meta tag is an effective method to exclude such pages from Google’s index.
By utilising the noindex tag, you can restrict the indexing of unimportant pages, allowing search engine crawlers to prioritise and focus on your most valuable content. This makes the noindex tag an indispensable tool in SEO, and we include auditing of all your SEO noindex tags as part of our technical SEO services.
Efficient crawling and indexing of your website are essential for maximising the organic traffic potential generated by valuable pages. To delve deeper into the indexing process, we recommend exploring our comprehensive guide to indexing SEO.
Ensure your website’s indexing strategy aligns with best practices and optimise your organic traffic by leveraging the power of the noindex tag.
Be quick! FREE spots are almost gone for this Month


LEAVE A REPLY